Latest Entries »

Swiftris – Fixing Gravity

As I mentioned on my previous post, Swiftris’ gravity is different than the http://en.wikipedia.org/wiki/Tetris#Gravity and that annoys anyone who played Tetris enough.

On the original Switris source, the gravity/collapsing behavior is implemented in ‘removeCompletedLines()’ which is called (weirdly) from within GameViewController’s implementation of the ‘gameShapeDidLand()’. Let’s start by just reimplementing removeCompletedLines() without changing its interface.

Here is the original implementation:
[sourcecode language=”javascript” title=”Swiftris.swift excerpt at the original removeCompletedLines()”]
func removeCompletedLines() -> (linesRemoved: Array<Array<Block>>, fallenBlocks: Array<Array<Block>>) {
var removedLines = Array<Array<Block>>()
for var row = (NumRows – 1) ; row > 0 ; row– {
var rowOfBlocks = Array<Block>()

for column in 0..<NumColumns {
//if block not null
if let block = blockArray[column, row] {
//add to the rowOfBlocks
rowOfBlocks.append(block)
}
}
//if amount of blocks equals the number of Columns
if rowOfBlocks.count == NumColumns {
removedLines.append(rowOfBlocks)
for block in rowOfBlocks {
blockArray[block.col, block.row] = nil
}
}
}

if removedLines.count == 0 {
return ([],[])
}

let pointsEarned = removedLines.count * PointsPerLine * level
score += pointsEarned
if score >= level * LevelThreshold {
level += 1
delegate?.gameDidLevelUp(self)
}

var fallenBlocks = Array<Array<Block>>()
for column in 0..<NumColumns {
var fallenBlocksArray = Array<Block>()

for var row = (removedLines[0][0]).row – 1; row > 0; row– {
if let block = blockArray[column, row] {
var newRow = row

//falls independently?
while (newRow < (NumRows-1) && blockArray[column, newRow+1] == nil) {
newRow++
}

block.row = newRow
blockArray[column, row] = nil
blockArray[column, newRow] = block
fallenBlocksArray.append(block)
}
}

if fallenBlocksArray.count > 0 {
fallenBlocks.append(fallenBlocksArray)
}
}

return (removedLines, fallenBlocks)
}
[/sourcecode]

and this is my implementation (different name but same signatures so you can just replace in GameViewController):
[sourcecode language=”javascript” title=”A redesigned gravity/collapsing lines with same signature”]
func removeFullLines() -> (linesRemoved: Array<Array<Block>>, fallenBlocks: Array<Array<Block>>) {
// Just so we can mock the original signature
var externalRemovedBlocks = Array<Array<Block>>()
var removedBlocks = Array<Block>()

// Just so we can mock the original signature
var externalFallenBlocks = Array<Array<Block>>()
var fallenBlocks = Array<Block>()

//Iterating from bottom of the Tetris grid; this is the summary of that loop:
// -> dropHeight = 0 (number of dropped rows to that point in the loop)
// for rows, bottom up
// if row is full
// -> save that row’s blocks to removedBlocks
// -> set nil for the whole row
// -> incread dropHeight
// else (row is not full)
// if dropHeight > 0
// -> lower that row by dropHeight rows

var dropHeight:Int = 0
for var row = (NumRows – 1) ; row > 0 ; row– {

if isRowFilled(row) {
for column in 0..<NumColumns {
//save row (we know its not null because its filled)
removedBlocks.append(blockArray[column, row]!)

//set nil
blockArray[column, row] = nil
}

//increase drop height
dropHeight += 1
} else {
if dropHeight > 0 {
//lower row by drop height
for column in 0..<NumColumns {
if let block = blockArray[column, row] {
block.row += dropHeight
blockArray[column, row] = nil
blockArray[column, block.row] = block
fallenBlocks.append(block)
}
}
}
}
}
externalRemovedBlocks.append(removedBlocks)
externalFallenBlocks.append(fallenBlocks)

if dropHeight == 0 {
return ([],[])
}

let pointsEarned = dropHeight * PointsPerLine * level
score += pointsEarned
if score >= level * LevelThreshold {
level += 1
delegate?.gameDidLevelUp(self)
}

return (externalRemovedBlocks, externalFallenBlocks)
}
[/sourcecode]

As you can see, the original Gravity is a lot simpler and makes the game harder & more fun. Also, note that ‘removeFullLines()’ has unnecessary complexity on its return values (Array of Arrays instead of simple Arrays) – we’ll fix that later.
And there’s a little problem with simply replacing ‘removeCompletedLines()’ by ‘removeFullLines()’; removeFullLines returns all fallen blocks in the same/first subarray of fallenBlocks; where the original one would return on subarray for each column. This causes a problem since the blockIdx within each of the subarrays is used to time a animation on the GameScene side so everything will work fine but the game will lock for a few seconds every time you fill a line (linear to the full amount of blocks falling), I plan to provide a way better fix for this later but for now this solves the immediate problem:

[sourcecode language=”javascript” title=”GameScene.swift before”]
// …
func collapsingLines(linesToRemove: Array<Array<Block>>, fallenBlocks: Array<Array<Block>>, completion:() -> ()) {
// …
// …
let delay = (NSTimeInterval(columnIdx) * 0.05) + (NSTimeInterval(blockIdx) * 0.05)
/// …
}
[/sourcecode]

To this:
[sourcecode language=”javascript” title=”GameScene.swift after”]
// …
func collapsingLines(linesToRemove: Array<Array<Block>>, fallenBlocks: Array<Array<Block>>, completion:() -> ()) {
// …
// …
let delay = (NSTimeInterval(columnIdx) * 0.05) + (NSTimeInterval(1) * 0.05)
/// …
}
[/sourcecode]

Now the game works as it should but the architecture of it is still a mess and all my fixes are basically hacks inside it. For my next post I’ll try to redesign/cleanup.. let’s hope for the best.

Swiftris – The last minute move

This post is of the Swiftris series so if you have no idea what I’m talking about, read this.

If you’ve played a lot of tetris in your life you understand that not all is over when one ‘tetrino’ touches the settled rubble at the bottom of the pit – when that happens you still have 1 ‘tick’ to move it sideways or even spin the piece if it fits! Let’s call that the ‘last move rule’. Swiftris ADDS code to prevent you from doing that – it prematurely settles the tetrino.

Somewhere in your Swiftris.swift file you’ll have something like:

[sourcecode language=”javascript” title=”Swiftris.swift excerpt”]
func letShapeFall() {
if let shape = fallingShape {
shape.lowerShapeByOneRow()
if detectIllegalPlacement() {
shape.raiseShapeByOneRow()
if detectIllegalPlacement() {
endGame()
} else {
settleShape()
}
} else {
delegate?.gameShapeDidMove(self)
if detectTouch() {
settleShape()
}
}
}
}
[/sourcecode]

‘letShapeFall()’ is the one method executed over and over when a shape is falling and ‘detectIllegalPlacement()’ is the method that verifies either the board contains an illegal placement.
Additionally, it introduces the ‘detectTouch()’ which simply duplicates the functionality of ‘detectIllegalPlacement()’ but implemented separately.. for no apparent reason.

‘detectTouch()’ is only used to ‘settle’ a tetrino when it touches the rubble at the bottom of the pit. Basically, only used to ‘ruin’ the ‘last move’ rule. Suppose we force ‘detectTouch()’ to always return false, that way, the ‘life’ of that tetrino will be extended by one ‘tick’ cycle only because as soon as ‘letShapeFall()’ is called again at the next cycle ‘detectIllegalPlacement()’ will return true and effectively ‘settleShape()’. You see, the current implementation offers two different paths for the ‘settleShape()’ calls where logically they should happen under the same circumstances. By any standards that stinks a bit. So, let’s just get rid of it. Try changing your code to this:

[sourcecode language=”javascript” title=”Swiftris.swift excerpt”]
func letShapeFall() {
if let shape = fallingShape {
shape.lowerShapeByOneRow()
if detectIllegalPlacement() {
shape.raiseShapeByOneRow()
if detectIllegalPlacement() {
endGame()
} else {
settleShape()
}
} else {
delegate?.gameShapeDidMove(self)

// Comment out this.
// if detectTouch() {
// settleShape()
// }
}
}
}
[/sourcecode]

Try it out.. everything still works fine and now the life of the Tetrinos at their last hopeless moment of fall is a tiny bit extended! Yay!

Now, if you look around you’ll see that there’s a LOT of code that is there for nothing.. detectTouch() is never used, and so isn’t ‘bottomBlocksForOrientations’ or ‘bottomBlocks’ in Shape.swift and all it’s child (JShape, LineShape, LShape, SquareShape, SShape, TShape, ZShape). You can safely remove all that and it’s about 80 lines.. that serve no purpose but be buggy and confuse ppl 🙂

For example, some shape implementations become really simple and short. TShape for example:

[sourcecode language=”javascript” title=”TShape.swift”]
class TShape:Shape {
/* … */

override var blockRowColumnPositions: [Orientation: Array<(cDiff: Int, rDiff: Int)>] {
return [
Orientation.Zero: [(1, 0), (0, 1), (1, 1), (2, 1)],
Orientation.Ninety: [(2, 1), (1, 0), (1, 1), (1, 2)],
Orientation.OneEighty: [(1, 2), (0, 1), (1, 1), (2, 1)],
Orientation.TwoSeventy: [(0, 1), (1, 0), (1, 1), (1, 2)]
]
}
}
[/sourcecode]

Try out the game after the changes.. it all works fine.. I hope!

Another problem with Swiftris is that whenever you complete a line it treats all blocks above that line as independently free falling – that’s not how original Tetris works and it makes the game a heck easier than the original. In the original, the fallen blocks all fall as a single connected mass leaving whatever small holes you had below it untouched. Plus, the logic for the fallen blocks, something intrinsic to the game is written inside Swiftris.swift but it’s called from the GameViewController.swift.. a pretty awkward implementation of any Model-View-Controller or Model-View-ViewModel pattern they got in there – it works and all but.. My next post will get a bit into that.

I’ve done it.. curiosity killed the cat and I plunged into the iOS world

I’ve had A LOT of free time lately. So I’ve ticked all the top items on the list: I’ve been surfing a lot, I finished reading two books I was stuck on, I visited all coffee places within an 30 minutes walk from home that had anything more than 3 stars on yelp.. yeah.. done it all..

And I still had some free time and some spare cash.. Then someone gave me a used MacBook (Thanks Christopher :), wherever you are!) so I’ve finally paid to be a ‘apple developer’ just so I could code something and run it on my phone (well, it’s technically not my phone but that’s a longer story).

First questions I was faced with was Objective-C vs. Swift. Well.. anyone in their sane minds will stay away from Objective-C, so Swift it is.

After some useless samples/tutorials I found this one: https://www.bloc.io/tutorials/swiftris-build-your-first-ios-game-with-swift  it’s premise is perfect. Not too simple, not too complex. It starts at a really nice pace (explaining all that deserves explanation and nothing that is too obvious). Later on you can see the writer getting annoyed/tired and flying past stuff. Well, can’t blame him: most people give up half way through anyway/it’s not like you couldn’t just read the code FFS/it works FFS! Anyway, highly recommend it as a starting point – it has worked well for me so far!

The thing is, the final game you develop has some things that really annoy me (code and functionality wise) so I’ll try to tip in my 20¢ on the next few posts.. 😀I'm Interested, go on!

QML Map’s addMapObject performance

After a crazy six-days holiday in Brazil and some never-ending flights I’m finally home and just to make it even better, Monday morning started with a head-on-brick-wall problem.

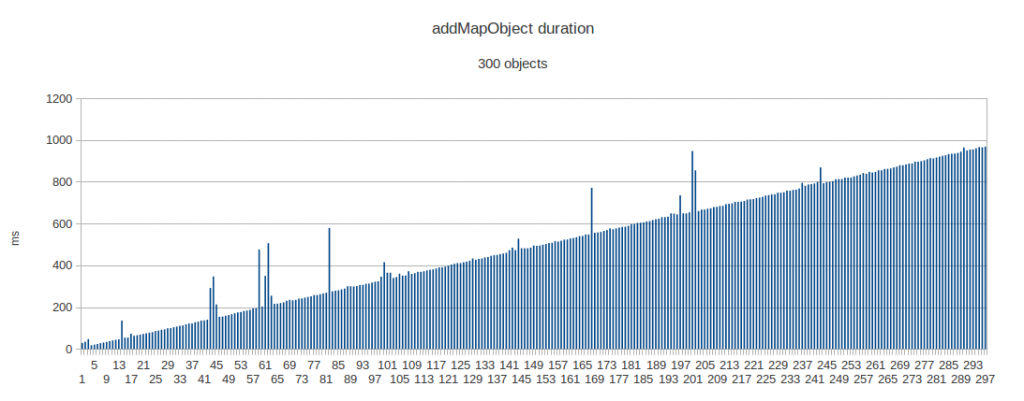
To put it shortly, adding objects to a QML maps appears to take linear time on the amount of mapObjects the map already holds. For some this might seem “not that bad” but it is. Basically, after adding 300 objects it’ll take approximately a second to add the 301th object. If you think in terms of “objects to be added”, the complete operation will be in O[n²].

(CHECK END OF ARTICLE FOR AN UPDATE & WORKAROUND)

Time for each insertion


I’ve already tried many different ways to add objects to the map (in addition to Map.addMapObject) without much improvement. I reckon the problem is that some checks/redrawing (prob O[n logn]) are performed at EVERY insertion and there’s no addMapObjectsList method that would first add all objects and then process/draw/check all items at the end on a single pass/go. . Am I missing something here or this feature/method is lacking only for simple laziness?

Related source seem to be at: https://qt.gitorious.org/qt-mobility/qt-mobility/blobs/master/src/location/maps/qgeomapdata.cpp#line454 which then goes to https://qt.gitorious.org/qt-mobility/qt-mobility/blobs/master/src/location/maps/qgeomapgroupobject.cpp#line158 .

Running out of ideas here except to lower the number of mapObjects …..

UPDATE: The real reason for such a bad performance is really only the (kind of) lack of a “addMapObjectsList”. Every time ONE item is added to the map, all items currently on the map are added. The solution (which becomes pretty obvious when you look at the source) is to add everything to a single MapGroup which wasn’t added to any map yet. Doing this the items are added but now drawn since there’s now linked map element. After all your items are added to this “root” MapGroup, adding that map group to the Map element will take linear time on the number of elements which is ok. Lots more info here .

While working on one of my current projects I came across the need for a map/geo browser.

From start, Qt Quick’s QML Map Element (using the nokia plugin) looked like the best option by a large margin and for all the good and sane reasons.

The problem is that the map element itself is quite simple/raw. At first I was expecting the Map Element to provide all the panning/pinch-zooming logic/functionality built in but it doesn’t.

Looking around for people with the same problem, I found this example from mlong (Huge thanks, that’s what got me started!). Seemed pretty good at first glance but I soon started missing some features. That example gives you the minimal shell around the Map QML element and is a great starting point.

The essential features I was still looking for were:

  1. Pinch-zooming centred at the pinch centre, not at the screen/map centre.
  2. While panning around, any minimal panning will trigger tile loading for the newly uncovered map regions (i.e. tiles adjacent to the on-screen map section are not pre-loaded as they could be)
  3. Zooming (on the original QML Map) is discrete (I confess this one was the one that bothered me more!). Your all human pinch gesture is translated to a dumb “Zoom In/Out” action just like old-style “+/-” buttons would..
  4. Flicking. The original QML Map’s  panning feels static and non-natural
  5. two-finger panning! Ok, this is a big one… As far as my world model goes, if while pinch-zooming(in/out) the user moves both fingers together, that means he’s panning/scrolling too! This is specially handy when you are looking for a place and you started the pinch gesture in a screen corner, it makes sense to bring that map section to the centre of the screen while zooming doesn’t it? It is a fact though that this is not a common feature in most mapping apps I tried (e.g. N8 and n950 Maps).
  6. Adapted to Portrait/Landscape nicely.

In short, the goal is that same pinch zooming behaviour that you get on the n950’s web browser.

As one can see it’s not just a “quick fix”. I kept thinking about this for a while and then it occurred to me that I could throw the Map element inside a Flickable and making the actual Map Element bigger than the screen. With this approach you’d solve the buffering/loading problems when panning and even get flickering for free. Then it also occurred me that I could use QML’s standard “scale” property to fill the gaps in between the different discrete zoom levels..

So, after quite a bit of hacking, I came up with this (.deb if you want to try it right away):

[sourcecode language=”javascript”]
/*
*
* This file is part of the Push Snowboarding Project, More info at:
* www.pushsnowboading.com
*
* Author: Clovis Scotti <scotti@ieee.org>
*
* This program is free software: you can redistribute it and/or modify
* it under the terms of the GNU General Public License as published by
* the Free Software Foundation, either version 3 of the License, or
* (at your option) any later version.
*
* See full license at http://www.gnu.org/licenses/gpl-3.0.html
*/
import QtQuick 1.1
import com.meego 1.0
import QtMobility.location 1.2
import Qt.labs.gestures 1.0
Flickable {
id: mapFlickable
property alias map: map
property double defaultLatitude: 51.5111
property double defaultLongitude: -0.0822898
property int defaultZoomLevel: 8
/*
zoomLevel gives powers of two.
*/
property double centeredContentX: map.size.width*0.75
property double centeredContentY: map.size.height*0.75
contentWidth: map.size.width*2
contentHeight: map.size.height*2
anchors.fill: parent
flickableDirection: Flickable.HorizontalAndVerticalFlick
pressDelay: 500//doesn’t really matter because I’m using the click
//normal panning happens at this level
//but if we’re close to the end of the map, we need
//to extend the panning to the map api.
states: [
State {
name: "inLandscape"
when: !rootWindow.inPortrait
StateChangeScript {
name: "updateToLandscape"
script: updateSizes("inLandscape")
}
},
State {
name: "inPortrait"
when: rootWindow.inPortrait
StateChangeScript {
name: "updateToPortrait"
script: updateSizes("inPortrait")
}
}
]
function updateSizes(newOrient)
{
// console.log("transformOrigin = " + map.transformOrigin)
// console.log("now in " + newOrient)
if(newOrient === "inPortrait") {
map.size.width = map.smallSize
map.size.height = map.bigSize-36*2
} else {
map.size.width = map.bigSize
map.size.height = map.smallSize-36*2
}
//// now in inPortrait
//// updateSizes, size = 970×1708
//// updateSizes, mapFlickable.size = 480×818 (status bar is 36px High)
//// now in inLandscape
//// updateSizes, size = 1708×970
//// updateSizes, mapFlickable.size = 854×444 (status bar is 36px high)
map.pos.x = map.size.width/2
map.pos.y = map.size.height/2
// map.center.latitude = defaultLatitude
// map.center.longitude = defaultLongitude
centeredContentX = map.size.width*0.75
centeredContentY = map.size.height*0.75
contentX = centeredContentX
contentY = centeredContentY
contentWidth = map.size.width*2
contentHeight = map.size.height*2
map.transformOrigin = Item.Center
map.scenter.x = map.width/2.0
map.scenter.y = map.height/2.0
console.log("tform at: " + map.scenter.x + " , " + map.scenter.y)
updateViewPort()
}
Component.onCompleted: {
if(inPortrait) {
updateSizes("inPortrait")
} else {
updateSizes("inLandscape")
}
contentX = centeredContentX
contentY = centeredContentY
map.pos.x = map.size.width/2
map.pos.y = map.size.height/2
flickDeceleration = 6000
maximumFlickVelocity = 4000
}
function updateViewPort() {
//one pass, pans map and updtes content(X|Y) accordingly
map.pan((contentX-centeredContentX)/map.getSkale,(contentY-centeredContentY)/map.getSkale)
//Division by scale rationale:
/*
content(X|Y)-centerContent(X|Y) distance is independent of scale.
scale === 1:
map’s top-left corner sits on top of content(X,Y)
scale === 1.5:
map is stretched, its top-left corner sits way outside
*/
contentX = centeredContentX
contentY = centeredContentY
}
onMovementEnded: {
updateViewPort()
}
Map {
smooth: true
id: map
property int smallSize: 2*480
property int bigSize: 2*854
//this values are constant and independent from scaling.
size.width: smallSize//mapFlickable.width*2//2*w;2*480//2*480//
size.height: bigSize //mapFlickable.height*2//2*h;2*854//2*854//
//this should stay constant at all times so that 2x zooming-in is possible
// pos.x: size.width/2
// pos.y: size.height/2
// scale: 0.1
/*
854 × 480
*/
// anchors.fill: parent
zoomLevel: defaultZoomLevel
plugin: Plugin { name: "nokia" }
mapType: Map.StreetMap
connectivityMode: Map.OfflineMode
center: Coordinate {
latitude: defaultLatitude
longitude:defaultLongitude
}
property alias scenter: tform.origin
property alias getSkale: tform.xScale
function setSkale(v) {
tform.xScale = v
tform.yScale = v
}
transform: Scale{
id: tform
}
}
PinchArea {
id: pincharea
anchors.fill: parent
property double initScale
property double p1toC_X
property double p1toC_Y
property double contentInitX
property double contentInitY
onPinchStarted: {
initScale = map.getSkale
p1toC_X = (pinch.center.x-map.size.width)
p1toC_Y = (pinch.center.y-map.size.height)
contentInitX = mapFlickable.contentX
contentInitY = mapFlickable.contentY
}
onPinchFinished: {
mapFlickable.updateViewPort()
}
onPinchUpdated: {
var contentDriftX = ((1-pinch.scale)*p1toC_X)
var contentDriftY = ((1-pinch.scale)*p1toC_Y)
//pinch.center.(x|y) drifts from to content, term in parenthesis offsets this back
//startCenter does not drift.
var tCenterDriftX = (pinch.center.x-(mapFlickable.contentX-contentInitX) – pinch.startCenter.x)
var tCenterDriftY = (pinch.center.y-(mapFlickable.contentY-contentInitY) – pinch.startCenter.y)
//test all two!
mapFlickable.contentX = contentInitX-contentDriftX-tCenterDriftX
mapFlickable.contentY = contentInitY-contentDriftY-tCenterDriftY
if(initScale*pinch.scale <= 0.75 && map.zoomLevel > 2) {
console.debug("zumUp")
map.zoomLevel -= 1
map.setSkale(1.5)
initScale = map.getSkale/pinch.scale
console.log("zoomUp to " + map.zoomLevel)
} else if(initScale*pinch.scale >= 1.5 && map.zoomLevel < 18) {
map.zoomLevel += 1
map.setSkale(0.75)
//map.scale 1.5 –> 0.75
//initScale_i*pinch = 1.5(map.scale_0)
//-> initScale_f*pinch = 0.75(map.scale_1)
// |{pinch = x} initScale = map.scale_1/pinch
initScale = map.getSkale/pinch.scale
console.log("zoomDown to " + map.zoomLevel)
} else {
if(! ((map.zoomLevel == 18 && (initScale*pinch.scale) > 2.0)
|| (map.zoomLevel == 2 && (initScale*pinch.scale) < 0.85))) {
map.setSkale(initScale*pinch.scale)
}
}
// console.log("S = " + map.scale + ", L = " + map.zoomLevel + ", I = " + initScale + ", C = " + mapFlickable.contentX + " , " + mapFlickable.contentY)
}
}
MouseArea {
anchors.fill: parent
onClicked: {
var coord = map.toCoordinate(Qt.point(mouseX-map.pos.x,mouseY-map.pos.y))
console.log("(long,lat) = (" + coord.latitude + " , " + coord.longitude + ")")
}
onPressed: {
console.log("(delay) pressed at " + mouseX + " , " + mouseY)
}
}
}

[/sourcecode]

The “continuous” zoom works by actually scaling the Map element (using transform: Scale{}..) until the next level of discrete zoom (Map.zoomLevel) is reached. The map would then switch to that new zoomLevel (upper or lower) and fix the Map scale accordingly.

If you look at the source you’ll notice that I’m not using the usual “Map.scale” property. I had to use the transform: Scale{..} . The problem is that when the screen orientation changes the whole map+flickable+content are changed too to fit it but then the scale transformOrigin (the point that stays in place when you scale something) wouldn’t change accordingly no matter how hard I tried; it would stay fixed to the first Item.Centre point where the scale was first changed.

The two finger zooming uses the pinch.center point and makes sure that point stays still in relation to the screen; for all pinchUpdates, the map is panned around to offset two types of drifts. The first is that the pinch.center coordinate will normally drift away due to the scaling point not being at the pinch.center, the second is due to the user actually moving the “pinch” around and thus moving the centre (this is what mekes the two-finger scrolling/panning work).

To use it, all you need is to include that Item in your page, like this:

[sourcecode language=”javascript”]
Page {
id: mapPage

//considering you saved the previous item in a file named: "ContinuousMap.qml"
ContinuousMap {
id: mapFrame

//onMap landmarks can be added from cpp or directly here.
}

//You can layer your own buttons/UI on top of the map by adding them here.
}
//….
[/sourcecode]

Hope you find this helpful.

How to install new harmattan dev packages to use on QtSDK

One thing I’ve been using a lot lately is Madde’s mad-admin to add development packages to the build tree that QtSDK uses to build armel applications and I pretty much figured that out alone – well, not completely alone but after seeing a how-to related to qtmobility installation for Maemo that used this without really explaining what was what).

Preamble:

QtSdk comes with a full build environment (analogue to what one`s got on scratchbox) for armel applications. This is used every time you build a Qt project selecting a device (N9(|(0|5)0)). This whole mechanism stays quite hidden inside the sdk’s files.

Problem:

Your application may have dependencies (headers, shared libs) on packages that are not provided with QtSDK. Without proper installation of this dependencies on QtSDK’s environment, you’ll never get code-completion, compiling or linking using the default SDK.

In a normal desktop-only world, you’d normally install development packages for a given library to then be able to compile/build applications that use such library. Only after installing those packages you’ll have the proper headers, shared libraries, etc needed to build your, “higher level”, application.

Debian packages tagged by the -dev suffix usually carry what is needed (e.g. headers) for a developer to “develop” something that uses the homonimous library. While the package without the -dev suffix carry what is needed to RUN (e.g. shared library) an application that uses such package. (worth nothing that a foo-dev package will normally depend on the foo pkg).

The question is: How to do this inside QtSDK’s own world.

The secret (for Harmattan) is inside

[sourcecode language=”shell”]
/QtSDK/Madde/bin/
[/sourcecode]

PS: for maemo it’s inside

[sourcecode language=”shell”]
~/QtSDK/Maemo/4.6.2/bin
[/sourcecode]

but works pretty much the same way.

There you’ll find to binaries that make handling this libraries/dependencies business as easy as on a normal debian system.

Say you have a library called libfoo and that you already have it built and packaged for harmattan/armel (well, that’s what I use Scratchbox for…but that stays for another post). You’ll probably have files like

[sourcecode language=”shell”]
libfoo_1.0_armel.deb
libfoo-dev_1.0_armel.deb
[/sourcecode]

Well, just do:

[sourcecode language=”shell”]
you@box:~/QtSDK/Madde/bin$ ./mad set harmattan-platform-api
you@box:~/QtSDK/Madde/bin$ ./mad-admin xdpkg -i ../path-to-that-deb/libfoo_1.0_armel.deb
Package ‘libfoo’ installed.
you@box:~/QtSDK/Madde/bin$ ./mad-admin xdpkg -i ../path-to-that-deb/libfoo-dev_1.0_armel.deb
Package ‘libfoo-dev’ installed.
[/sourcecode]

In line 1 you-re setting which target you are referring (you can select which target you are using in QtCreator’s project management window.
After that, on line 2 and 4 it’s pretty much the same thing as using dpkg -i. Voila! Now your QtCreator will recognize your new lib and all’s good.
Remember that you’ll need that foo_1.0_armel.deb package installed on the device but that should be automatic if you reference to it on your debian/control file and if that package is in the same
repository as your application.

Well, gotta go back to something useful.
Hope this helps someone.

N9(|50) Full SDK + Scratchbox Installation + Setup

Hi there!

So I got a new computer, why am I even talking about it? Because now I’ll have to set up everything I have on the new box.

To start with, the box is a Lenovo ThinkPad T520 with a clean Ubuntu 11.04, amd64 install.

For the record, 10.10 just won’t work with the T520, apparently all that sand in the bridge makes the old ubuntu skid and fall to death. After installing 317Mb of updates, upgraded to 11.04, disabled Unity (after a horrid 30 minute trial; don’t wanna talk about it now..) and finally started doing something useful.

Ok, now let’s get to the useful part, this post will mostly be just a collection of links anyway.

QtSDK; follow the instructions on that page to run the installer. Run the custom installation and select, under Experimental, Harmattan  (I picked both the Remote Compiler  and the Qt Quick Components for Symbian ones too..). I`d recommend getting Qt`s sources here too. Installation takes a long time so don’t bother and take yourself some coffee time.

Harmattan Scratchbox: Even though most of the work/development for the N9(|50) can be done through the QtSDK, one’s quite locked in there. I highly recommend using scratchbox for many reasons. Among them:

  1. makes it really easy to compile/build a generic linux package to harmattan. Many times you can take a package’s source from ubuntu/devian, build it inside scratchbox (with the proper target – HARMATTAN_ARMEL – set) and you’ll have a working .deb for Harmattan even if it’s got nothing to do with Qt. Building a .deb within QtSDK for a package that doesn`t use qmake just doesn’t make sense and will probably be a PITA.
  2. Makes the task of packaging comprehensible and “clean” without too many black magic (if you are familiar with debian packages, you`ll feel at home).
  3. Using the HARMATTAN_X86 target you can test your application/package/sw in an equivalent (but compiled to your pc`s own native architecture) environment that really works and has got all the harmattan qt quick components. QEMU is just unusable for me.

Basically, if you consider using anything further than Qt/QML pure apps, you`ll probably need it. If you didn’t get anything I said above, forget this whole guide and go do something else.

A very good guide on how to set Scratchbox up is here . The guide is pretty good and the python script there is pure magic.

Finally this article explains really well how to use scratchbox.

This is basically all you need to start..

Back to work now! 😀

Bash History, History Expansion and that command+args you aways forget

Since I’m taking this blog thing a lot more serious now, I’ll devote a quick blog post to one of the things I love more about the Bourn Again SHell: history.

Working in a Linux environment inevitably makes you use a shell (i.e. the actual brain behind the famous “temrinal”). There are many shells one could use but I’ll risk saying bash is the most common. In all fairness, if you are any sort of coder/developer/debugger/hacker/script-kiddie/indiana-jones-of-the-computer-world you’ll eventually fall in love with it. It’s also worth mentioning that most people (me included), they never “sat down” to learn bash. We just started copy&pasting commands we saw somewhere, then you start reading whatever you’re posting, then you learn to use manpages (or equivalent), etc.. 5 years later you certainly “know your ways”.

For all bash/shell related problems/questions, there are probably 5 different ways around it. That said, it’s common to stick always to the same tools/methods for solving all problems…

“this way works, so why learning anything new?”

Basically, Time! The more culturally aware you are in terms of bash & bash scripting; the quicker you’ll solve your problems.

Finally, after all this obvious blogish talk, let’s get to the point:

[sourcecode language=”shell”]
history
[/sourcecode]

That command shows all the previous commands you (your user) executed. Ages ago I learned to use it with grep to see what command I had executed that had *string* on it.

[sourcecode language=”shell”]
history | grep g++
[/sourcecode]

This one’s really useful and if that’s new to you, this post is already worth it’s effort. But that one’s clumsy,
you’ll probably end up copying & pasting something by using that filthy rat of yours or by petting that flat life-less thing on
your notebook – that’s not efficient.

By running that command you’ll see that there’s an index for each command executed; for example:

[sourcecode language=”shell”]
#lol.. those are the oldest entries on my history (5k commands long)
cpscotti@clovis-laptop:~$ history
1  cd push-snowboarding/
2  git status -s
3  cd PushBurton2
4  ls
5  git status -s
6  git add *.cpp *.h

[/sourcecode]

That index is there for a very nice reason; History Expansion. By entering !index, you’ll run that line again. Suppose I want to
run an old command again ( e.g. meego-sb-session start ) which is hard to remember or too long to type, one can just find out the
index for the last occurrence of that command and.. voila!

[sourcecode language=”shell”]
[sbox-HARMATTAN_X86: ~] > history | grep start
167  history | grep start
168  meego-sb-session start
501  meego-sb-session start
503  history | grep start
[sbox-HARMATTAN_X86: ~] > !168
meego-sb-session start

[/sourcecode]

But hey, if you are still lazy to type in those two lines.. we can go further!
There’s another command I execute quite often that’s just a PITA to remembering/type..:

[sourcecode language=”shell”]
cpscotti@clovis-laptop:~$ Xephyr :2 -host-cursor -screen 854x480x16 -dpi 96 -ac +extension Composite &
[/sourcecode]

Diving a bit more into history‘s manpages you’d find the ” ? “and a lot more!
I won’t explain much, just watch! 😀

[sourcecode language=”shell”]
cpscotti@clovis-laptop:~$ !?Xep?
Xephyr :2 -host-cursor -screen 854x480x16 -dpi 96 -ac +extension Composite &
[/sourcecode]

Of course you have to “know your past” otherwise you’ll end up executing bizarre commands but well.. that works great for me!

Enjoy!


Oh, one last thing! You can “pimp up” your history’s size! I think Ubuntu’s default is 2000.. way to small in my opinion! Just edit HISTSIZE inside your .bashrc script!

(in doubt check manpages for bash and history!)

Preventing CPU Meltdown

Ok, I’ll try this.

For real now.

Yesterday my notebook’s fan had its last spins. The bastard was bugging me for a while but now it’s gone.. was I a bit more emotional I’d probably be crying now.

So basically, my notebook is running on fukushima-mode. No fan.. wild and dangerous computing. The problem is that whenever I get into something serious (any long compilation or watching a 1080p snowboarding video like this) it grows hotter and hotter until the kernel steps in with a VERY mean attitude, killing the whole thing and shutting down the machine and interrupting whatever I was doing.

At some point I figured I could manually kill -STOP $naughtyJob wait for the cpu to cool it’s guts and then let the naughtyjob continue whatever it was doing with -CONT. Nice idea.. I bet you can’t do that on Windows – well, probably you can but I don’t wanna know and don’t come telling me!

The problem is that sometimes you just don’t realise the damn machine is already too hot until you see the shutdown screen and start raving about the new FAN that’s not even on the mail yet! The rational thing a Control Engineer would do is automate the -STOP/-CONT process – behold the life-saving shell script! Wasn’t god written in awk anyway?

The basic idea is to set a “too hot” and a “chilling” points; if it’s too hot the script STOPs the processor using more CPU at the time. If it’s chilling, the script CONTs those processes. You definitely need a quite big band in between the two points (see Hysteresis)  so that your script won’t run amok on you and get everything even worse.. I’m with 65ºC/80ºC now.

Drumroll please… (Ok.. this is just a hour-hack.. works for me, saving the day till my new fan arrives)

[sourcecode language=”shell”]
#!/bin/bash
hotT=80
coolT=65

watchT=1
coolDownT=3

while true;
do
sleep $watchT
temp=`cat /proc/acpi/thermal_zone/THM/temperature | awk ‘{print $2}’`

if [ $temp -lt $coolT ]
then
echo "Chilling"
cat haltedReactors.list | while read -e tLine;
do
fukuPid=`echo $tLine | awk ‘{print $2}’`
fukuComm=`echo $tLine | awk ‘{print $3}’`
kill -CONT $fukuPid
zenityLine="Restarted "$fukuComm", pid: "$fukuPid
zenity –info –text "$zenityLine"&
done
rm -f haltedReactors.list
touch haltedReactors.list
fi

if [ $temp -gt $hotT ]
then
echo "Burning"

fukushimaLine=`ps -A -o pcpu,pid,comm –sort pcpu | tail -n 1`
fukushimaPid=`echo $fukushimaLine | awk ‘{print $2}’`
fukushimaComm=`echo $fukushimaLine | awk ‘{print $3}’`

kill -STOP $fukushimaPid
zenityLine="Stopped "$fukushimaComm", pid: "$fukushimaPid
echo $zenityLine
zenity –info –text "$zenityLine"&

echo $fukushimaLine >> haltedReactors.list
sleep $coolDownT

fi

done
[/sourcecode]

I’m using this for two hours now. So far firefox-bin was paused twice and spotify once. On the bright side, the hot machine’s running strong since this ungodly morning started.

Have fun!

Free and Open Source Software authors have rights!

Some recent events made me realise that maybe the biggest [dark] force against the FOSS “movement” is misinformation. Sometimes people really don’t know what it is about – and I’m not talking about people from completely unrelated fields, I’m talking about important people that simply never had the reason (or opportunity) to understand the GPL,LGPL or things like that.

Anyone can see that things really changed in the past 3 or so years but parts of the Open Source philosophy are still unknown to the main public – people think that in “open source” and “free” no one has any rights over it and that after you have released it, its not yours any more.

This misinformation really scares people that are in doubt on whether releasing or not some piece of software as FOSS. Even though people want to build a “community” around some project and to share it, they are afraid that doing so is like negating all property on said software.

Quick hint: releasing something as open-source and licensing it properly is more like:

“Whatever you wrote will ALWAYS be yours”.

If you feel like being on this misinformed bunch don’t feel bad, you are not alone but please, get some reading going on:

http://www.gnu.org/licenses/gpl.html